The Ice House, Lochinch Castle Estate.

The Ice House, Lochinch Castle Estate.

Ice House, Lochinch Castle Estate

Recently returned from the lovely Stranraer area, having been asked to produce two new virtual Tours for Lochinch Castle Cottages.
The first, Balker Lodge was shot last year and can be seen on their website Castle Kennedy Gardens – Holiday Cottages. In this visit we were asked to produce tours for Chauffers Apartment and the newly refurbuished Ice House.

In addition to shooting the tours, we were privaledged to be one of the first guests to stay in the Ice House, which despite its name was beaufifully decorated and fitted out, and very cosy.

Here is the tour we produced for the Ice House, Lochinch Castle Estate. Please click on the image to open the virtual tour.
The Ice House, Lochinch Castle Estate

The Ice House, Lochinch Castle Estate is located on a quiet part of the estate, close to the home farm. Wildlife abounds and red squirrels, deer, owls, phesants, bats are regularly seen. Quiet, cosy and yet only a couple of miles from Stranraer. Whats not to like?

Whilst on the estate we also shot the other holiday cottage on the estate, The Chauffers Apartment. This 3 bedroomed cottage stands in a courtyard adjacent to the castle and on the first floor, over the garages.

Click on the image below to view the 360 virtual tour.
Chauffeurs Apartment, Lochinch Castle Estate

A beautiful spot, quiet, relaxing and all in beautifully presented cottages. I have no doubt we will be back.


Holiday Cottage Virtual Tours

Holiday Cottage Virtual Tours

Holiday Cottage Virtual Tours

Here are the latest holiday cottage virtual tours, completed for our clients at Lakeland-Hideaways These cottages were shot on 3 September and are now live on the clients website.

360 Virtual Tours are a great way to showcase your property, and say far more than still images or Tourist Board ratings, allowing potential guests to have a complete wander around your property.

Please click on the cottage image to view the 360 Virtual Tour.

The first cottage is Primrose Cottage.
Holiday Cottage Virtual Tours

The second is Smithy Cottage.
Holiday Cottage Virtual Tours

We have received so many favourable comments from our clients and property owners regarding the quality and more importantly the benefit of having a virtual tour. Many have reported a significant increase in bookings which when you consider the cost of a virtual tour, is fantastic value for money marketing.

We are off to Scotland shortly for more holiday cottage virtual tours. Watch this space.

Luxury Holiday Apartment Llandudno

Luxury Holiday Apartment Llandudno

Luxury Holiday Apartment Llandudno – The Alderley on Abbey Road

In addition to 360 Virtual Tours, we also provide web design servies for selected customers as in the case of this luxury holiday apartment Llandudno The Alderley on Abbey Road.
Luxury Holiday Apartment Llandudno
The Alderley, on Abbey Road in Llandudno, offers period character and elegance, contemporary style and comfort in this two bedroomed, ground floor luxury holiday apartment. Many original, character features within the luxury apartment have been retained and the tasteful modernisation reflects this. It has been awarded 5* by Visit Wales.

The Alderley Holiday Apartment is located approximately just a short stroll from the delightful beach front promenade, Mostyn Cresent, with its Victorian Llandudno Pier, and a safe and clean beach. It is also conveniently situated close to the variety of shops, restaurants, cafes, banks and numerous tourist attractions and activities that popular Llandudno has to offer, yet is located on a quiet, well kept road just below the Great Orme rock and its Victorian furnicular tramway, which is a must to ride and offers a charming way to view the resort.

Llandudno is the largest seaside town on the north coast of Wales and is on a promentary between the rocky outcrops of the Great and Little Ormes. There are two wonderful beaches, the award winning North Shore, and the quieter sand duned West Shore. A few miles away is the stunning medieval town of Conwy with Conwy Castle standing guard at its entrance. The beautiful Isle of Anglesey is a short drive away and offers a wealth of sandy bays, forest walks and scenic rides. Llanberis is approximately 30 miles away, from where you can take the scenic railway up to the top of Mount Snowdon, the highest mountain in Wales with its breathtaking views. Snowdonia National Park offers a wealth of things to do and see for visitors.

Sorry, the Alderley in Llandudno does not accept pets. It is a No Smoking property.

Singing Ringing Tree

Singing Ringing Tree

Singing Ringing Tree – Burnley

Always looking for something a little different, what about the Singing Ringing Tree, on the moors above Burnley.

The Singing Ringing Tree is aptly named. A 3-meter-tall, wind-powered musical sculpture made of galvanized steel pipes, it stands high above the English town of Burnley. The pipes swirl to form the shape of a tree bent and blown by the wind, and produce an eerie, melodious hum as the constant wind on Crown Point drifts through them.

Click on the image to view the Virtual Tour, ensure your speakers are turned on.
Singing Ringing Tree

School Virtual Tour

School Virtual Tour

School Virtual Tour

Just completed another school, this time very local to where we are located.
This school is St James the Less, Roman Catholic Primary in Rawtenstall.
Part of the fun here is to locate “Jimmy the Bear”, the school mascot, who is hidden in the scenes for the children to find.

Click on the image to view the Virtual Tour.
School Virtual Tour

Shooting schools is really fun, especially when the children are present. From 4 years to 11, it is always great to see the next generation and I am always surprised how up to date many of the children are with technology.

School Virtual tours are a great way to showcase the schools facilities to parents, the community and to the wider audience.

360 Virtual Tours – Camera Setup

360 Virtual Tours – Camera Setup

360 Virtual Tours – Camera Setup

In this earlier postings we looked at what a virtual tour is, then the equipment we use to capture the images for the tours. In 360 Virtual Tours – Camera Setup we will take a look at how we photograph property virtual tours.

Having set up the pano head, as mentioned in the second part of this tutorial, the camera is placed on the pano head, and fixed to the tripod.
The camera height is set at approximately 5 ft to give a normal view of the room, and the tripod placed in a suitable position in the room. Normally this is as close to the centre of the room, but sometimes this is not practical as in the case of bedrooms where often the bed is in the way, so the camera has to be positioned to give the best overall view.

The camera is set to Manual. It is imperative that the camera is set to manual, and the same settings are used when shooting all of the images for the room.

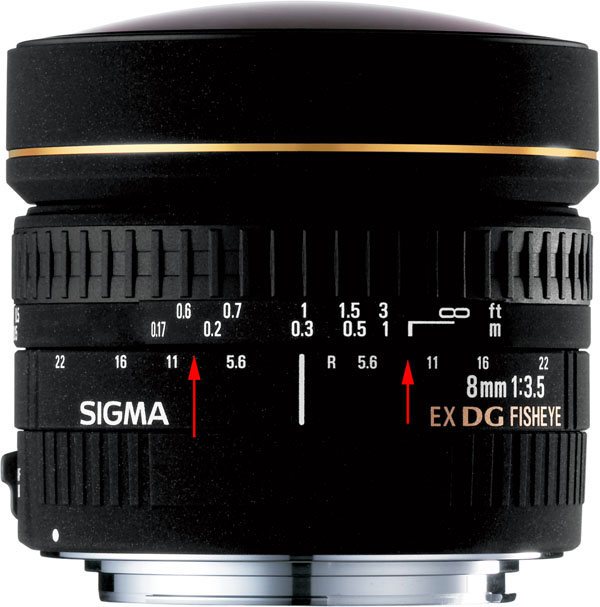
The lens, which has an autofocus facility, is also set to manual as we do not want anything to change between the shots for the room.
With the camera set to manual, the aperture is set to f10, which is mid range giving the best balance between shutter speed and focal depth.
The focus ring is set to the hyperfocal length for the f10 aperture. This give a range of “in focus” from around 0.65ft to infinity.
360 Virtual Tours - Camera Setup

The camera is now set for automatic exposure compensation, which means the camera will take 3 shots at the same position. The first is -2 stops from the midpoint exposure, the second shot is at 0 (ie the correct exposure) and the third shot at +2 stops. The process of exposure bracketing is to brighten the darkest areas by 2 stops, and to reduce the exposure of the brightest areas by 2 stops, reducing the risk of burnout at windows.

Point the camera to a position in the room that have the average light. For example in a normal room the window will be the brightest position, 180 degrees away from the window will give the darkest position, so the camera is pointed to a mid point and the shutter speed set so that the exposure mid way on the camera exposure meter. With Exposure bracketing set, the camera will now take 3 shots as seen in the image below:

360 Virtual Tours - Camera Setup

The camera is now rotated through 90 degrees and the next set of images taken. There are no changes made to the shutter speed… all the images for this panorama MUST be taken at the same settings.

Once the 4 sets are done, making up the full 360 degrees, we then point the camera vertically up and shoot the 3 images, and finally, using the nadir adapter, point the camera vertically down, and move the tripod so the camera can “see” where the tripod was standing, and photograph the set of 3 exposures for this direction. So that’s it… one room shot leading to 18 images in total.

The same process is now done for each room in turn, the only thing different being that in each room, a fresh meter reading is taken and used for that location. So long as the 6 sets of images that make up each room are taken at the same initial exposure setting, then everything will be ok.

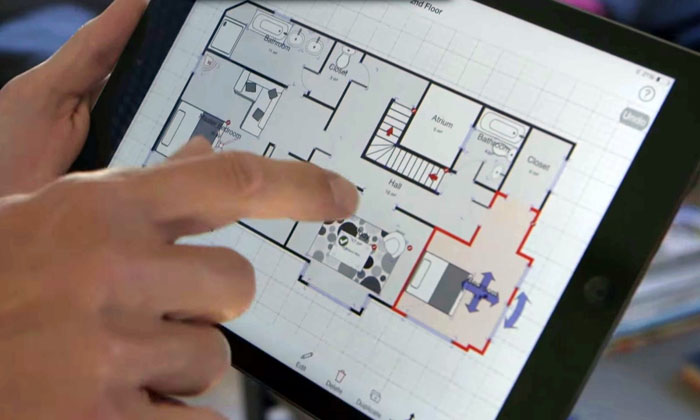
Next, and this is not photography, but part of what we do at 360virtual-tours.net is to prepare the floor plan which will be added to the virtual tour when the tour is compiled. To produce the floor plan we use a devilishly cleaver iPad (or iPhone/Android) App called Magic Plan. Click on the image to find more about this App. 360 Virtual Tours Tutorial
Finally, using another camera, fitted with a wide angle lens, take any still images internally and externally, that we may use later, to compliment the complete virtual tour.

So, thats the photography side…. a typical house might require 200 images for the panoramas and perhaps 10-20 still images some of which may be used in the tour.

Thats it… so long as the basic rules are followed, you will have a set of images which are now ready for processing.

To shoot an average house takes around 1 hour to shoot and prepare the floor plan. If only the processing was that quick – More of that in the next part of the tutorial.

360 Virtual Tours – What and How

360 Virtual Tours – What and How

360 Virtual Tours – Equipment

Having defined what a 360 Virtual Tour is, we now take a look at 360 Virtual Tours – Equipment.

As a virtual tour is displayed in a digital form, the images used are captured using a digital camera.
In theory you can use just about any camera or mobile phone to make a virtual tour, however if you are looking to produce a quality virtual tour, you do need some specialised equipment. (as mentioned in the introduction the specific details are what we, at 360virtual-tours.net use, other virtual tour photographers may well use different equipment.

360 Virtual Tours – Equipment – The Camera.

A decent quality camera is required. We currently use a Canon 550D (or Rebel T2i as known in the US)
360 Virtual Tours - Equipment
This is an 18MP camera with a cropped 1.6x sensor. Whilst not “top of the range” this is perfectly adequate for the job in hand.

360 Virtual Tours – Equipment – The Lens.

Without doubt the most important part of the equipment.
360 Virtual Tours - Equipment
It is possible to use just about any lens for taking images for virtual tours, however, in order to capture the full 360 degrees round, and the full 180 degrees, from floor to ceiling, then multiple images are required.
For example, the lens normally supplied with this camera is the Canon EFS 18-55. If used to shoot a full 360 panorama this would require 32 images to cover the complete 360 Degrees by 180 Degrees.
10 shots at 36 degree separation, at -45 degrees from the horizontal
10 shots at 36 degrees separation at 0 degrees from the horizontal
10 shots at 36 degrees separation at +45 degrees from the horizontal
1 shot Zenith ( vertically up)
1 shot Nadir (Vertically down.)

Thankfully we do not use this. We use a Sigma 8mm circular fisheye lens, having an almost 180 degree field of view, makes it possible to capture the full 360 by 180 in 5 shots. (3 at 120 degree intervals, one zenith, one nadir). In fact we use 4 shots round at 90degree intervals, giving a greater amount of overlap, making the stitching of the images easier, zenith and nadir. (More about this later)

360 Virtual Tours – Equipment -The Pano Head

To ensure that the images taken for the panorama are all level and taken from exactly the same spot, the simplest way is to use a pano head.
Whilst there are some photographers who do panoramas freehand, it does require a steady and a lot of practice to get right.
As with all types of equipment there is a broad range of possible equipment. At 360virtual-tours.net we us a simple but very effective Nodal Ninja 3 Mk2 with a Nadir adapter.
360 Virtual Tours - Equipment360 Virtual Tours - Equipment
The Pano head serves to hold the camera and lens in a precise position so that the No parallax Point is immediately over the dead center of the tripod, and the camera and lens rotate around this NPP point. (For more detailed information on how to determine the NPP please see: Finding The Nodal Point

360 Virtual Tours – Equipment -The Tripod

As mentioned above, we use a tripod combined with the Pano head, to mount the camera and lens at exactly the correct position to overcome parallax issues. The reason why we use this particular tripod (Manfrotto MT190CXPro4)is because of its length when closed down (for easy of carriage especially if having to take on board a plane), and its weight. This is a brilliant little tripod, excellent for what we want to use it for.
360 Virtual Tours - Equipment
When shooting a lot of panos in one day, not having to lug around a heavyweight tripod is a real bonus…

That is the main hardware we use, and apart from a rucksack to carry it in, and I also carry a second camera fitted with a wide angle lens for shooting interior stills, spare batteries, spare memory cards, lens cleaning cloths, and other sundry bits and pieces that s it…

In the next episode we will look at the image shooting techniques used in a 360 Virtual Tours…

Bjork’s 360 Video

Bjork’s 360 Video

Bjork’s 360 Video

Something a little different, Bjork’s 360 Video.
Love her, or Hate her (bit like marmite I guess) but you have to take your hat of to Bjork. She is original.
Have a look at this, her latest video.

Why have I included this on my Blog? Well, it is a 360 panorama, shot as a 360 Video and of course I also like Bjork as asinger.
So why not I thought.

Bjork's 360 Video

360 virtual tours – What and How…

360 virtual tours – What and How…

360 Virtual Tours Tutorial – Introduction

When you have been in the business of producing 360 Virtual Tours for 9 years, it is very easy to assume that everyone knows what a virtual tour is, and how they are produced. However, questions asked by property owners would suggest in fact, that this is not the case. I remember one property owner asking me at the end of the shoot, could she look at the tour, not realising the work that is required once we have finished the shoot.

So, in order to unveil the mysteries around 360 Virtual Tours, and to set out what a Virtual Tour is, and how they are made, we will be running a series of tutorials, over the coming weeks and months, looking at the various steps that are taken to produce your virtual tour.

I apologise in advance to other Virtual Tour companies who may use other processes and equipment. This 360 virtual tours tutorial is based on what we use and do at 360virtual-tours.net

First of all “What is a 360 Virtual Tour?”

Some companies claim to offer virtual tours for as little as £25, but what is a virtual tour?

If you were to look around of a Castle, for example, you would want to see more than just one room. One room is NOT a virtual Tour, it is simply one scene. We regard a 360 Virtual Tour as a complete presentation of a property, including if appropriate, an interactive floor plan and possibly still or panoramic images of the grounds. In this way you enable your website visitors a complete view of the property. Our virtual tours also show the complete room including floor and ceiling and not a large logo image on the floor.

360 Virtual Tours Tutorial Example

Click on the image below to enter the tour.

360 Virtual Tours Tutorial

So, this is one of our 360 Virtual Tours… in the next episode, we will look at the equipment we use to photograph our virtual tours. Keep coming back.

360 Virtual Tours Tutorial

Mont Blanc Virtual Tour

Mont Blanc Virtual Tour

This IS an impressive virtual tour.

How about an tour, comprising 70,000 images stitched together and 365 GIGApixels in size…. taken at an altitude of 3,500meters in sub zero temperatures….which if printed at 300dpi would cover a football pitch….. NOW THATS IMPRESSIVE…

Bit like a bus… you wait ages for one, then two arrive together… so it is in the world of Virtual Tours.
In our work, one room displayed through 360 degrees and up and down 180 degrees, takes 18 images, and the image we use in the tour before compression is around 200MB in size

Take a look for yourself…. (and no, Im not that crazy to do this kind of work… but I take my hat off to those that did..)

Click on the image below to enter the tour.
virtual tour of Mont Blanc

 
Call Now Button

wp